Search This Blog

Wednesday, April 3, 2013

DASHBOARDS IN SSRS

Dashboards are useful for customizing the display of data to a user. It is used to highlight interesting and useful aspects of data, link to important searches, and display common reports.
SSRS dashboard contains different types of visualization which display certain metrics on some dimensions or reports. The metrics can be changed by using filter conditions on above display panel. Each time we change the filter conditions it is going to strike the database and fetch the data for that filter. We can also give dynamic link to another report.
 

Charts : 


A chart is a graphical representation of data, in which "the data is represented by symbols, such as bars in a bar chart, lines in a line chart, or slices in a pie chart". A chart can represent tabular numeric data, functions or some kinds of qualitative structures.
The term "chart" as a graphical representation of data has multiple meanings:
·         A data chart is a type of diagram or graph, that organizes and represents a set of numerical or qualitative data.
·         Maps that are adorned with extra information for some specific purpose are often known as charts, such as a nautical chart or aeronautical chart.
·         Other domain specific constructs are sometimes called charts, such as the chord chart in music notation or a record chart for album popularity.
Charts are often used to ease understanding of large quantities of data and the relationships between parts of the data. Charts can usually be read more quickly than the raw data that they are produced from. They are used in a wide variety of fields, and can be created by hand (often on graph paper) or by computer using a charting application. Certain types of charts are more useful for presenting a given data set than others. For example, data that presents percentages in different groups (such as "satisfied, not satisfied, unsure") are often displayed in a pie chart, but may be more easily understood when presented in a horizontal bar chart. On the other hand, data that represents numbers that change over a period of time (such as "annual revenue from 1990 to 2000") might be best shown as a line chart. It is important to carefully prepare and understand your data before you create a chart, as this will help you design your charts quickly and efficiently.
 
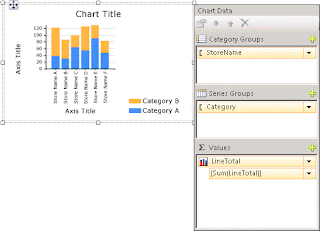
The following illustration shows many of the different elements used in the chart:

 
 You can publish charts separately from a report as report parts. Report parts are self-contained report items that are stored on the report server and can be included in other reports. Use Report Builder to browse and select parts from the Report Part Gallery to add to your reports. Use Report Designer or Report Builder to save report parts for use in the Report Part Gallery. For more information, see Report Parts (Report Builder and SSRS) and Report Parts in Report Designer (SSRS) on the Web at microsoft.com.
 
 
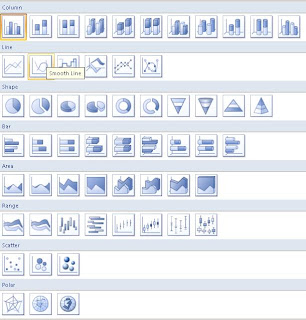
SSRS supports various kinds of charts like:
 
·         Column Charts
·         Line Charts
·         Different Shapes
·         Bar Charts
·         Area Graphs
·         Range Graphs
·         Scatter Graphs
·         Polar Graphs
 
 
This figure will show all the possible charts in SSRS-2008:
 
 
Designing a Chart:
 
After you add a chart data region to the design surface, you can drag report dataset fields for numeric and non-numeric data to the Chart Data pane of the chart. When you click the chart on the design surface, the Chart Data pane appears, with three areas—Category Groups, Series Groups, and Values. If the report has a shared or embedded dataset, the fields in the dataset appear in the Report Data pane. Drag fields from the dataset into the appropriate area. By default, when a field is added to one of the areas of the chart, Reporting Services calculates an aggregate for the field. You can also use series grouping to dynamically generate series. The chart is also closely related to the matrix.
                                        
 
Adding Data to the Chart:
 
Suppose you have a report that shows Sales by Name. You drop the Full Name field to the Category Groups area and the Sales field to the Values area.
When you add the Sales field to the Values area, the text of the data field appears in the legend, and the data from this numeric field will be aggregated into one value. By default, the value is aggregated using the built-in function Sum. The Chart Data pane will contain a simple expression for your field. In our example, [Sum(Sales)] will appear for the field expression =Sum(Fields!Sales.Value). If no groups are specified, the chart will only show one data point. In order to show multiple data points, you must group your data by adding a grouping field. When you add the Name field to the Category Groups area, a grouping field of the same name as the name of the field is automatically added to the chart. When fields that define the values along the x and y axes are added, the chart has enough information to plot the data correctly.
When the Series Groups area is left empty, the number of series is fixed at design time. In this example, Sales is the only series that appears on the chart.
Category and Series Groups in a Chart:
 
A chart supports nested category and series groups. Charts do not display detail data. Add groups to a chart by dragging dataset fields to the category and series drop zones for a selected chart.
Shape charts such as pie charts support category groups and nested category groups. Other charts such as bar charts support category groups and series groups. You can nest groups, but make sure that the numbers of categories or series do not obscure the presentation of information in the chart.
Adding Series Grouping to a Chart:
If you add a field to the Series Groups area, the number of series depends on the data that is contained in that field. In our earlier example, suppose you add a Year field to the Series Groups area. The number of values in the Year field will determine how many series will appear on the chart. If the Year field contains the years 2004, 2005, and 2006, the chart will display three series for every field in the Values area.
Note : You can see information about Indicators in SSRS in My next Blog

Friday, March 15, 2013

Functions in SSRS

Functions in SSRS:


In Reporting Services, expressions are used to provide dynamic flexibility for controlling the content and appearance of a report. Some expressions are created for you automatically. For example, when you create a new report and drag fields from datasets onto report items, the values of text boxes are automatically set to expressions that refer to the dataset fields by name. During report processing, each expression evaluates to a single value that replaces the expression when a report is rendered. Expressions are also used throughout the report definition to specify or calculate values for report item properties, text box properties, parameters, queries, bookmarks, document maps, filters, and group and sort definitions.
You create expressions on report items by entering text in text boxes, in properties, or through a dialog box. An expression is written in Microsoft Visual Basic. An expression begins with an equal sign (=) and consists of references to constants, operators, functions, and built-in report global collections including fields and parameters. You can also create references to .NET Framework classes, custom code, and assemblies external to report processing.

Executing Functions:

Steps to execute functions:

1. Left click any field in the report where functions are needed.


2. Click in the Expression as shown in the picture.

3. Write the functions as per required as shown in the picture.


Thursday, March 7, 2013

SSRS - Basic Reporting Techniques

                                             SQL SERVER REPORTING SERVICES

Report Services Architecture :
• Report Server: It is the core engine that drives Reporting Services.


• Report Manager: It is a Web-based administrative interface for Reporting Services.

• Report Designer: It is a developer tool for building complex reports.

• Report Builder: It is a simplified end-user tool for building reports.

• The Report Server database stores report definitions. Reports themselves can make use of data from many different data sources.

Using Report Designer:

Report Designer can create reports of any complexity that Reporting Services supports, but requires you to understand the structure of your data and to be able to navigate the Visual Studio user interface.

Creating a basic table report:

The easiest way to create a report in Report Designer is to use the Report Wizard. Like all wizards, the Report Wizard walks you through the process in step-by-step fashion. You can make the following choices in the wizard:

• The data source to use

• The query to use to retrieve data

• Whether to use a tabular or matrix layout for the report

• How to group the retrieved data

• What visual style to use

• Where to deploy the finished report

Steps to create a Basic report:

1. Open Business Intelligence Development Studio.

2. Select File > New >Project.

3. Give the appropriate name and save it desired location.

4. Open the created project and view solution explorer.

5. Right click shared data source -> Add new data source.

6. Give the Name, Type of the source database and the connection string.

7. Test the connection to successfully create a data source.

8. In reports folder, right click ->Add new report.

9. Select the shared data source to proceed further and click the Query builder button to create the dataset.

10. In query builder, click the Add Table toolbar button to import the required tables and build a query according to the requirement given.

11. Select the appropriate columns that are required.

12. Test the query using the run button.

13. Click next ->Select tabular layout and click next.

14. Move the grouping column to the group area and other columns to the detailed area.

15. Click next and select the layout format.

16. Give the report name and click finish.

17. The Datasets window shows the data that is available to the report.

18. The main design window lets you view the report itself. You can see a preview of the report, work with the report in a layout designer, or work with the query that returns the data for the report.

19. The Solution Explorer, Output, and Properties windows are the standard Visual Studio windows.

Modifying a Report

We created a report with the Report Wizard, We can modify it with the Report Designer.

• We can change the available data or the sort order for the report by modifying the query on the Data tab.

• We can resize or rearrange controls on the Layout tab.

• We can use the Properties window to change properties of individual controls including their font, alignment, colors, and so on.

Filters and Parameters:

Report parameters enable you to control report data, connect related reports together, and vary report presentation. The two methodologies followed to reduce the number of rows in a report are,

1. Dataset Parameter

2. Report parameter

Report Parameter:

Filter parameter, are applied after the data is returned from the server. All possible data is returned from the database, and then the filter is applied to the data being seen. This means as a user switches from one filter to another it is very fast, as all the data is already present in memory and only data being displayed is changing.

Steps to create a Report parameter:

1. Create a dataset for the parameter values.

2. In Report data ->Right click parameter and click new parameter.

3. Type the name and prompt name of the parameter.

4. Choose the data type of the parameter.

5. By default, the parameter will be visible. If needed we can change the visibility options.

6. From available values tab, select the get values from query option and select the dataset, value field and label field for the parameter.

7. From default values tab, we can give the default values if needed.

8. Click ok to finish.

9. To apply the report parameter to the table, select the dataset of that table. Right click –go to dataset properties.

10. In dataset properties select filters and click add.

11. In expression, select the column for which we need to apply filter.

12. Select the required operator and In value select the parameter value and click ok.

Report Parameter (Multi value):

To have a multi value report parameter, follow the same procedure as above and select the allow multiple values option.

Report Parameter (Cascading):
You can create cascading parameters, where the user chooses a value for each parameter in a specific order, and each choice successively limits the values for the next parameter. Cascading parameters can reduce potentially thousands of choices to a manageable number.

Steps to create cascading report parameter:

1. Create dataset for the Parent parameter.

2. In parameter folder, Add new parameter and give the name and prompt name for the parameter and select the data type.

3. In Available values tab, select the corresponding dataset and the value and label field.

4. Create a new dataset for the child parameter and in the where clause pass the prompt value of parent parameter (or) In the Child parameter properties ->go to filter ->click add and apply the filter.

5. In parameter folder, create the child parameter with appropriate name and data type.

6. In Available values tab, select the corresponding dataset and the value and label field.

Dataset Parameter:

Query parameter are applied before the query to get data is sent to the database, and only the data that fits the criteria from the parameter is brought back. This is ideal for situations where most of the time a user is going to look at only one set of data.

Steps to create dataset parameter:

1. Create a dataset for the parameter values.

2. In Report data ->Right click parameter and click new parameter.

3. Type the name and prompt name of the parameter.

4. Choose the data type of the parameter.

5. By default, the parameter will be visible. If needed we can change the visibility options.

6. From available values tab, select the get values from query option and select the dataset, value field and label field for the parameter.

7. From default values tab, we can give the default values if needed.

8. Click ok to finish.

9. To apply the parameter to the appropriate table, select the dataset of the table and in the query designer -> go to the query write a where clause and apply the parameter.

Example: where categoryid=@category

@category is the parameter created.

Tuesday, March 5, 2013

Plant A Seed

A successful business man was growing old and knew it was time to choose a successor to take over the business.


Instead of choosing one of his Directors or his children, he decided to do something different. He called all the young executives in his company together.

He said, "It is time for me to step down and choose the next CEO. I have decided to choose one of you. "The young executives were Shocked, but the boss continued.” I am going to give each one of you a SEED today - one very special SEED. I want you to plant the seed, water it, and come back here one year from today with what you have grown from the seed I have given you.

I will then judge the plants that you bring, and the one I choose will be the next CEO."

One man, named Jim, was there that day and he, like the others, received a seed. He went home and excitedly, told his wife the story. She helped him get a pot, soil and compost and he planted the seed. Every day, he would water it and watch to see if it had grown. After about three weeks, some of the other executives began to talk about their seeds and the plants that were beginning to grow.

Jim kept checking his seed, but nothing ever grew.

Three weeks, four weeks, five weeks went by, still nothing. By now, others were talking about their plants, but Jim didn't have a plant and he felt like a failure. Six months went by -- still nothing in Jim's pot. He just knew he had killed his seed. Everyone else had trees and tall plants, but he had nothing. Jim didn't say anything to his colleagues, however, he just kept watering and fertilizing the soil. A year finally went by and all the young executives of the company brought their plants to the CEO for inspection.

Jim told his wife that he wasn't going to take an empty pot. But she asked him to be honest about what happened. Jim felt sick to his stomach, it was going to be the most embarrassing moment of his life, but he knew his wife was right He took his empty pot to the board room. When Jim arrived, he was amazed at the variety of plants grown by the other executives. They were beautiful in all shapes and sizes. Jim put his empty pot on the floor and many of his colleagues laughed, a few felt sorry for him!

When the CEO arrived, he surveyed the room and greeted his young executives. Jim just tried to hide in the back. "My, what great plants, trees and flowers you have grown," said the CEO. "Today one of you will be appointed as the next CEO!" All of a sudden, the CEO spotted Jim at the back of the room with his empty pot. He ordered the Financial Director to bring him to the front. Jim was terrified. He thought, "The CEO knows I'm a failure! Maybe he will have me fired!"

When Jim got to the front, the CEO asked him what had happened to his seed - Jim told him the story. The CEO asked everyone to sit down except Jim. He looked at Jim, and then announced to the young executives, "Behold your next Chief Executive Officer! His name is Jim!" Jim couldn't believe it. Jim couldn't even grow his seed. "How could he be the new CEO?" the others said.

Then the CEO said, "One year ago today, I gave everyone in this room a seed. I told you to take the seed, plant it, water it, and bring it back to me today. But I gave you all boiled seeds; they were dead - it was not possible for them to grow.

All of you, except Jim, have brought me trees and plants and flowers. When you found that the seed would not grow, you substituted another seed for the one I gave you. Jim was the only one with the courage and honesty to bring me a pot with my seed in it. Therefore, he is the one who will be the new Chief Executive Officer!"


Moral: Honesty is a lifestyle of a winner. If you are honest, you have infinite power supporting you.

Microsoft MSBI Certification Details

                                          Microsoft Certifications


MCSA (Microsoft Certified Solution Associate)

1. Querying Microsoft SQL Server 2012

2. Administering Microsoft SQL Server 2012 Databases

3. Implementing a Data Warehouse with Microsoft SQL Server 2012

MCSE (Microsoft Certified Solution Expert)
1. Implementing Data Models and Reports with Microsoft SQL Server 2012

2. Designing Business Intelligence Solutions with Microsoft SQL Server 2012

Skills Measured:

MCSA - Querying Microsoft SQL Server 2012

1. Create Database Objects (24%)

a. Create and alter tables using T-SQL syntax (simple statements).

b. Create and alter views (simple statements).

c. Design views.

d. Create and modify constraints (simple statements).

e. Create and alter DML triggers.

2. Work with Data (27%)

a. Query data by using SELECT statements.

b. Implement sub-queries.

c. Implement data types.

d. Implement aggregate queries.

e. Query and manage XML data.

3. Modify Data (24%)

a. Create and alter stored procedures (simple statements).

b. Modify data by using INSERT, UPDATE, and DELETE statements.

c. Combine datasets.

d. Work with functions.

4. Troubleshoot & Optimize (25%)

a. Optimize queries.

b. Manage transactions.

c. Evaluate the use of row-based operations vs. set-based operations.

d. Implement error handling.

Cost :

The cost to take up this certification is 80 USD

MCSA - Administering Microsoft SQL Server 2012 Databases

1. Install and Configure (19%)

a. Plan installation.

b. Install SQL Server and related services.

c. Implement a migration strategy.

d. Configure additional SQL Server components.

e. Manage SQL Server Agent.


2. Maintain Instances and Databases (17%)

a. Manage and configure databases.

b. Configure SQL Server instances.

c. Implement a SQL Server clustered instance.

d. Manage SQL Server instances.

3. Optimize and Troubleshoot (14%)

a. Identify and resolve concurrency problems.

b. Collect and analyze troubleshooting data.

c. Audit SQL Server instances.

4. Manage Data (19%)

a. Configure and maintain a back up strategy.

b. Restore databases.

c. Implement and maintain indexes.

d. Import and export data.

5. Implement Security (18%)

a. Manage logins and server roles.

b. Manage database permissions.

c. Manage users and database roles.

d. Troubleshoot security.

6. Implement High Availability (12%)

a. Implement AlwaysOn.

b. Implement database mirroring.

c. Implement replication.

COST :

The cost to take up this certification is 80 USD

MCSA - Implementing a Data Warehouse with Microsoft SQL Server 2012

1. Design and Implement a Data Warehouse (11%)

a. Design and implement dimensions.

b. Design and implement fact tables.

2. Extract and Transform Data (23%)

a. Define connection managers.

b. Design data flow.

c. Implement data flow.

d. Manage SSIS package execution.

e. Implement script tasks in SSIS.

3. Load Data (27%)

a. Design control flow.

b. Implement package logic by using SSIS variables and parameters.

c. Implement control flow.

d. Implement data load options.

e. Implement script components in SSIS.

4. Configure and Deploy SSIS Solutions (24%)

a. Troubleshoot data integration issues.

b. Install and maintain SSIS components.

c. Implement auditing, logging, and event handling.

d. Deploy SSIS solutions.

e. Configure SSIS security settings.

5. Build Data Quality Solutions (15%)

a. Install and maintain Data Quality Services.

b. Implement master data management solutions.

c. Create a data quality project to clean data.


COST :

The cost to take up this certification is 80 USD

Note: We can take all the three certifications of MCSA in a shot with the cost of 204 USD

MCSE - Implementing Data Models and Reports with Microsoft SQL Server 2012

1. Build an Analysis Services Database (38%)

a. Design dimensions and measures.

b. Implement and configure dimensions in a cube.

c. Design a schema to support cube architecture.

d. Create measures.

e. Implement a cube.

f. Create Multidimensional Expressions (MDX) queries.

g. Implement custom logic in a data model.

h. Implement storage design in a multidimensional model.

i. Select an appropriate model for data analysis.


2. Manage, Maintain, and Troubleshoot an SSAS Database (18%)

a. Analyze data model performance.

b. Process data models.

c. Troubleshoot data analysis issues.

d. Deploy SSAS databases.

e. Install and maintain a SSAS instance.

3. Build a Tabular Data Model (17%)

a. Configure permissions and roles in Business Intelligence Semantic Model (BISM).

b. Implement a tabular data model.

c. Implement business logic in a tabular data model.

d. Implement data access for a tabular data model.

4. Build a Report with SQL Server Reporting Services (SSRS) (28%)

a. Design a report.

b. Implement a report layout.

c. Configure authentication and authorization for a reporting solution.

d. Implement interactivity in a report.

e. Troubleshoot reporting services issues.

f. Manage a report environment.

g. Configure report data sources and datasets.


COST :

The cost to take up this certification is 80 USD

MCSE - Designing Business Intelligence Solutions with Microsoft SQL Server 2012

1. Plan Business Intelligence (BI) Infrastructure (15%)

a. Plan for performance.

b. Plan for scalability.

c. Plan and manage upgrades.

d. Maintain server health.

2. Design BI Infrastructure (16%)

a. Design a security strategy.

b. Design a SQL partitioning strategy.

c. Design a backup strategy.

d. Design a logging and auditing strategy.

3. Design a Reporting Solution (24%)

a. Design a Reporting Services dataset.

b. Manage Excel Services/Reporting for SharePoint.

c. Design a data acquisition strategy.

d. Plan and manage reporting services configuration.

e. Design BI reporting solution architecture.

4. Design BI Data Models (34%)

a. Design the data warehouse.

b. Design a schema.

c. Design cube architecture.

d. Design fact tables.

e. Design BI Semantic Models.

f. Design and create MDX calculations.

5. Design an ETL Solution (11%)

a. Design SSIS package execution.

b. Plan to deploy SSIS solutions.

c. Design package configurations for SSIS packages.

COST :

The cost to take up this certification is 80 USD

Note: We can take all the two certifications of MCSE in a shot with the cost of 136 USD